Pages

Thursday, March 31, 2011

Hamelman's WW Multgrain Soaker pg 169

I must tell you that I wasn't really excited about this bread, mostly because I really like a multigrain bread that I make already.  It has all the things I really like in it, including some raisins and sunflower seeds.  Just a touch of sweet fruit really gives me a wonderful toast for the morning.  The recipe is one that I simply tweaked till I got it the way I liked it.  It's 100% fresh ground hard red wheat, and contains a cereal blend from Bob's Red Mill.  Here's a link to my blog about this bread!

Really, I am trying to stretch myself to make other breads, so that I have experience with all sorts rather than a few I really like.  Between BBA and this challenge I have made breads that I probably NEVER would have made (loved Casatiello), and might never make again (Rich Mans Brioche). 

Back to the subject at hand, I am working with another group of baker's which call themselves Mellow Baker's and we are baking from a book called, Bread: A Baker's Book of Techniques and Recipes by Jeffrey Hamelman. They are already through about half of the book, so I am starting midway. Here's a picture of my 50% Whole Wheat Multigrain Levain bread:

From HamelmansMultSoaker

And the crumb shot....

From HamelmansMultSoaker

I posted the rest of the pictures on Picasa, with explanations on what I did to make the bread. Link to

Tuesday, March 29, 2011

Comparison, Older Winter White Wheat vs Montana Winter White Wheat

I know that they say that hard winter wheat can last a long time, but I didn't believe it till I opened up some stored wheat that I have had since 1999. Near as I can tell from reading online, it says that as long as the wheat doesn't taste bad and has been stored correctly it should have retained it';s good quality. My husband picked up a bag of Montana Winter White wheat in Boise a few weeks ago, and I decided to compare loaves of bread side by side using as close to precise measurements as I could. One loaf would be from the wheat I had stored and the other would be from the fresh wheat he picked up from Walmart.

From MontanaVsGotInCali


This is where I first noticed a difference, the loaf on the left is the newer wheat.  I made sure that I wasn't even a gram off in my measurements, yet it appeared to be a higher hydration dough then the one on the right.  The weight of the dough was exactly the same when I weighted it after fermentation and before shaping.  These are each exactly 2 lb loafs of bread.


Color differences were due to temperature difference, between the loaves and the rolls.  The loaves were baked together at the same temp.  One on the left is the newer wheat.  Hard to tell here, but the one on the right is actually a bigger looking loaf.


I accidentally switched the position of the cut slices, so the one on the left is the older wheat.  I cut both loaves at what I perceived to be the tallest part of the loaf.  The newer wheat had a slightly denser crumb.  The taste in both was very good, really couldn't tell much of difference there.  The only noticeable difference was that the newer wheat had a higher moisture content possibly and caused the dough to be at a higher hydration even though they had exactly the same ingredients.  For some reason even though it appear to have a higher hydration, the older wheat had a better crumb and a taller loaf. 

Monday, March 28, 2011

100% Whole Wheat Flax Seed bread

From WWFlax

I have been experimenting with soaking the fresh ground flour in kefir/buttermilk overnight before making it into a loaf of bread. This is supposed to make the bread easier for your body to digest. What I am finding however is that it makes the entire loaf of bread easier to make, and gives me a lot more consistent results in the end. I have decided though that I will hold back about 100 grams of the flour in order to make it easier to add the yeast and salt the next morning. My loaves seem to rise better and their texture and crumb seem better too.  It's all just an experiment right now, but it seems to be working quite well.


Here is the formula I used for this loaf and the rolls. I used an egg wash on them, and the crust color difference is simply baking at different temperatures.  The rolls were baked directly on a pizza stone, at a lower temperature.  I simply mixed the soaker ingredients together the night before, then added the 20 grams water, 9 grams salt, and 10 grams yeast in the morning.  I held the salt back for the first two minutes of kneading till the yeast and water were mixed in well.  Next time I will also hold back 100 grams of flour from the initial soak, just for easier mixing of yeast and water, but I will probably allow it to autolyse for 30 minutes before adding the salt to the mix just to make sure that it doesn't end up to dry.

Note: Due to egg being in the soaker I refrigerated it overnight rather than leaving it on the counter.

Sunday, March 27, 2011

Pizza night...

Forget the days of perfectly round looking pizza's.  I no longer make them fit a pizza pan, and most times they come out in the oddest shapes, but they are really awesome cooked on my pizza stone.  My home made pizza's were always pretty good, but once I learned how to use my stone to it's fullest potential it made them so much better.  This one I made with chorizo sausage, onion, and red pepper which I sauteed in olive oil before topping the pizza with it. 


Pizza dough made with 70% White Whole Wheat, 30% bread flour, water, salt, olive oil, and yeast.

From WW70%Pizza


I used home made spaghetti sauce I made a few days earlier, and a mix of 3 different cheeses.  It was another really great pizza!  (Tim - it had red sauce, mushrooms, and onions so you wouldn't have liked it)


I am finding that when your breads and pizza's are good enough, it really effects your desire to actually eat out and enjoy it. It's really hard not to think, "Wow!  I think my bread, roll, or pizza dough is actually better than this!"  That is a really strange feeling....

The life of kittens....


What can I say? This picture says it all! Let's see, they worked hard to get us up to feed them. This link is a perfect example of our nights with these kittens.  Makes us want to wake them up all day long, so they are tired at night!!!  Anyway, they got us up to feed them, then played for a little while till I brought in the fresh milk from the goats.  Time to harass mom till she gives us milk, followed by long naps!

Hamelman's WW Levain pg 168

I decided to do a step by step of my first Hamelman's recipe, from "Bread".  I thought I would share previous loaves of Sourdough bread that I have made in the past month or so.  These first two pictures are of the breads I finished baking today from "Bread".  The step by step directions are below the comparison shots.

From HamelmansWWLevain

Here's the crumb shot from one of the two loaves.  I made them with Fresh Ground Winter White Wheat, and it is a 50% WW and 50% bread flour sourdough (levain) bread.  My starter "Arnold" has been alive since Thanksgiving, and normally has a really nice sour twang to it.  I have made sourdough breads for quite a long time, but for some reason I simply stopped baking breads for quite a few years.


The next picture is of a 100% WW sourdough bread.  I made it with fresh ground Winter Red Wheat, and did not add any bread flour to it.  Ingredients were WW, water, salt, and starter.


The next two pictures are of a loaf made with 100% Winter White Wheat, fresh ground.  It's ingredients were also simply WW, water, salt, starter.


I sliced this one in half lengthwise, because I made sandwiches out of it. 


I miss the open crumb I find in my regular unbleached ap or bread flour sourdough loaves.  Guess I am a little bit spoiled by that, and I could actually eat only sourdough white bread and be totally happy.  The flavor of the wheat is nice, but I really enjoy the sour taste from a loaf of white flour sourdough.  Trouble is that it is probably really not that good for me!  Fresh ground whole wheat is a much better choice, and has a wonderful flavor of it's own.  I am hoping to get better at producing the open crumb with a whole wheat bread.  Practice practice practice....

Here is a little bit of Arnold about to be mixed into the water.  He is a 100% Whole Wheat sourdough starter.


Whole Wheat added to the levain (starter).


Here is the poolish/levain/starter ready to sit out overnight.  It was nice and moist, but thick like a poolish/sponge should be.  Arnold had a nice smell to him before adding him to the mix.


Here's a picture of the dough which I kneaded for about 4 minutes, on speed setting #2.  My kitchenaid says that I should only use the #2 setting when making breads.  The dough nicely toes out at the bottom, and cleans the side of the bowl.  I thought it might be a little bit dry, and I think next time I will follow my instincts and put a little bit more water in. 


I pulled it out and put it into a greased bowl. It felt a little underdeveloped from what I normally do, but I knew that it called to be folded a couple times which would make it stronger.


Nice looking dough after the initial fermentation, still on the dry side for wanting an open crumb.


Split ready for weighing and shaping.


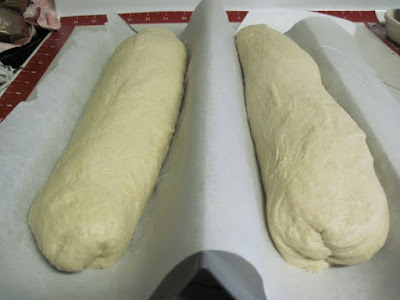
Rough shaping almost finished, allowed to rest ten minutes, and then made them longer into a baguette shape.  I like baguettes for sourdough and french breads. 


Ready for an overnight rest in the fridge.  I will pull them out in the morning and let them warm up and rise before baking.


Ready to cool off.  Second picture of loaves just pulled from the oven.  Need more practice with my razor blade, although it's possible I simply can't get enough steam in my oven to allow the bread to open up like it should.  I am also used to baking my breads at 500* for 5 minutes and then turning the temp down to 450* so when I put these in and didn't think about it and simply did it that way.  We live at 3821 feet above sea level, so I don't believe the temp difference was that great. 


Saturday, March 26, 2011

Sausage Egg and Cheese Breakfast sandwiches


Home made English Muffins make really awesome breakfast sandwiches. I used a mild sausage, eggs from free range chickens on my farm, and sharp cheddar cheese. Andy was very happy with this mornings breakfast! I will tweak the muffin recipe and possibly try a few others, till I get it to be exactly like I want it in the future. Sounds like I will have to make more of these, since my son saw them and wants some for when he is home for spring break next week! He's pretty spoiled and I will probably make him pizza, pizza pockets, muffins, and whatever I can to make his visit home a good one! I can even make it all with whole wheat, since he prefers the taste of ww breads. It's going to be a busy week for me....
Posted by Picasa

Friday, March 25, 2011

BBA English muffins, crumpets, and good memories....

Links to my fellow baker's in the Bread Baker's Apprentice Challenge, 2011!  Here are links to their versions of this bread.  They are all very talented baker's, who have gotten together to share their results from baking the Bread's in Peter Reinhart's book Bread Baker's Apprentice.


Our host Chris at A Ku Indeed!
Nancy at Bread&Cake&More 
Coz at ScratchBaker 
Jim at OvenMinded
I will post others as they finish theirs!


Today is the day for making my first English muffins.  I know that Andy will love these, in fact he has been waiting for these since Christmas.  Really I should have done them sooner, but there have been so many recipes to try and things to do that I just hadn't gotten to it.  Another storm rolled in last night giving us a ton of rain followed by a skiff of snow overnight, which means it's pretty chilly in the house today, so it's another perfect baking day!

English muffins and crumpets always remind me of a time years ago when I was a young teen.  My mom took me to a small tea house and we sat and talked while we ate English muffins toasted with crab and jack cheese melted on top.   We each had a cup of fancy tea, and it was such a good day.  I remember feeling very grown up. That is a memory I will never forget, one of those times when you know that your mom loves you and wants to be with you.

She asked for the recipe for those crab and cheese topped English muffins, and would make them occasionally throughout my teen years.  I can't remember if we had crumpets that day, but they also bring memories of growing up.  They always have butter and honey on them, and simply make my mouth water and my brain transports back to my childhood.  I think I will make them next....

From BBA English Muffins

Everything in it's place, so very organized.  Now if you know me well, you will realize that the bowl is sitting on another counter with everything except the buttermilk/kefir in it.  I started to put things away, when I realized I hadn't taken a picture of it so I hastily grabbed it all together in one spot and took a "pretty" picture so you would all think "She is so organized!".  I am the one that has to rerun the recipe in my head a dozen times to make sure that I didn't leave anything out.


Here are the dry ingredients all added together.  I adjusted the recipe by using 50% fresh ground Winter White Wheat rather than all bread flour, replaced the sugar with honey, and used kefir in place of buttermilk.  I normally use the baker's percentages for the BBA recipes, but this time the recipe only made 6 English muffins which I figured we would eat pretty quickly.  I weighed everything according to the book, and used measuring spoons for the honey, salt and yeast. 


I went ahead and put the entire 8 oz of kefir into the flour mix, figuring if it was to wet then I would simply add a little flour. 


It was looking pretty sticky at this point, so I allowed it to autolyse for half an hour.  This seems to help a lot, especially when working with whole wheat flours.


What starts out very sticky, ends up quite manageable after kneading it for 6 minutes after it's 30 minute nap. Here it is, with the bowl looking all clean on the sides.  I love when dough has this consistency, just makes it so easy to work with.


Time to scoop it out of the bowl and form it into a boule.  I will let it rise for 90 minutes, possibly a little longer because it's cold in the kitchen today.


It looks so small in the container I use to do the first rise.  Getting used to recipes that make a large amount of dough, which I usually reduce down to 2 lb so I don't get over run!


Here it is after it's first rise, ready to be gently removed from it's jar and carefully made into small boule's.

It just seems like such a small amount of dough to me!


Wow, only a little over a pound of dough!


I have these cool English muffin rings that I got for Christmas and have been wanting to try. I sprinkled semolina into the rings after I sprayed the parchment paper with oil. The rings have shortening on them, to keep them from sticking.


Dough has risen for 90 minutes, ready to fry!!!!


Things were looking pretty good at this point and I decided to fry three with rings off and three with rings on. I put the muffins into the pan, and then pulled the rings off these ones. They immediately started to spread slightly in the pan. I fried them for 6 minutes, and when I turned them over they were burnt on that side! Yuck, my pan was to hot even though it was set to the temp in the book. I then turned it down 50 degrees, and hoped for the best. I fried that side for 5 minutes.


Here are the three I fried with the rings on, including when I flipped them over.


At that point I took the rings off, and continued frying them. The pan was a much better temp, and I fried them for 8 minutes on each side.


Here they are all ready to cool off and then to eat. They look pretty good!


Crumb shot....